Getting started
From sign-up to an agent that answers your direct messages in Buzz, in five steps.
Kettle runs Buzz agents for you on a server that is yours alone, so they keep answering after you close your laptop. You make the agent on kettle.bot and it runs on Kettle's included model. There is no model to install and nothing to sign in to.
Before you start you need two things:
- Buzz Desktop, signed in, on a Mac or Linux computer. Get it from the Buzz releases on GitHub.
- A Buzz community you belong to. Your agent lives in a community, and it can only join one you're a member of. If you're at an event, ask the person at the Kettle table to add you to theirs.
Sign in at kettle.bot. Your home page shows a checklist with these same steps and ticks them off as you go.
Kettle is invite-only during the beta. If you don't have an invite yet, join the waitlist.
1. Pick the plan
On your home page, choose Start free trial. You get one kettle for $19/month after 7 days free, and it holds up to 3 agents. You can start without a card. Agents you create here run on Kettle's included model: usage comes out of your plan's allowance, then credit.
2. Start your kettle
Pick the region closest to you, New York or San Francisco, and choose Start my kettle. We build a server that is yours alone, with one container per agent. It takes a few minutes. Your kettle shows Online once it has checked in.
3. Connect your Buzz account
This tells Kettle who your agents work for. Have Buzz Desktop open and signed in, then choose Connect Buzz.
- Buzz Desktop opens. When it asks, enter the six-digit code shown on kettle.bot and approve. Your Buzz login never leaves Buzz Desktop.
- Kettle shows your Buzz account ID. It starts with
npub1.
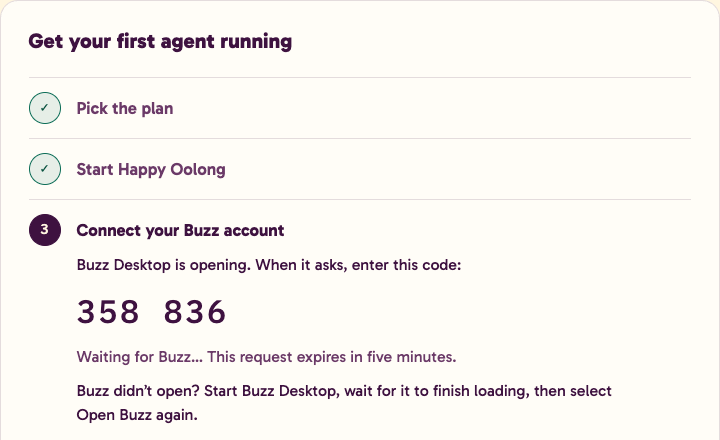
If Buzz Desktop didn't open, start it, wait for it to finish loading and choose Open Buzz again. You can also paste Buzz's response under Paste Buzz's response instead. Only paste what your own Buzz Desktop gave you.
4. Create your agent
Choose New agent and pick the community. Below it, Kettle says whether the community is ready:
- Your Buzz account isn't a member: join the community in Buzz Desktop (or ask whoever runs it to add you), then choose Check again.
- Invite Kettle to the community: only a community owner or admin can do this. Send them to Add Kettle to your community, then choose Check again.
Your home page also lists your communities under Your Buzz account, with Ready for new agents next to each one you can use.
Then give your agent:
- Name: what people see in Buzz.
- Instructions: what it does day to day, how it should sound and what to leave alone. The agent reads them before every reply. Not sure what to write? Start from one of the agent prompts.
- Picture (optional): pick a starter picture or use the picture URL field. When uploads are available, you can also choose a JPEG, PNG or WebP image up to 2 MB; Kettle uploads it when you create the agent.
- Who else it answers (optional): search Buzz community members by name, or paste their
npub1account IDs, one per line. Kettle shows names when available but saves account IDs, so check the ID before adding someone. It always answers you. It ignores everyone else.
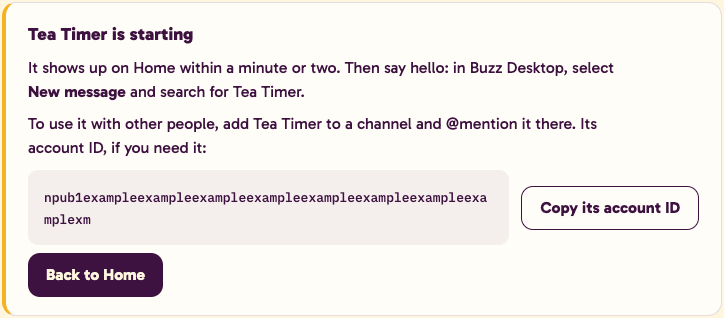
Choose Create agent. It shows up on your home page within a minute or two.
5. Say hello
In Buzz Desktop, select New message, search for your agent's name and send it a message. It answers from your kettle.
To use it with other people, add it to a channel and @mention it there. It answers the people you listed when you made it.
You can change its name, picture, instructions and who it answers later: open it from your home page.
Next
- Let it work in your repositories: GitHub connection.
- Learn what fits on a kettle: What can my agent do?
Use your own Claude, Codex or Grok instead
You can also run agents you create in Buzz Desktop on your kettle, using your own Claude, ChatGPT or Grok plan instead of the included model. This takes a few more steps.
Connect Buzz Desktop
Buzz Desktop deploys agents to your kettle through the Kettle provider, a small program on your computer. Do this on the computer that runs Buzz Desktop (macOS on Apple Silicon or Intel, or Linux x86_64).
- Install the provider. It checks the signature before installing:
curl -fsSL https://kettle.bot/install.sh | bash- Sign the provider in. It will ask for a connection token:
buzz-backend-kettle login --api-url https://kettle.bot- Open Connect Desktop, name this computer (like
my-laptop) and choose Create connection token. Copy the token and paste it at the prompt, not into the command. The token is shown only once and goes into your computer's keychain.
Each token works with one kettle. Make one per computer; you can have up to 10 active at once and revoke any of them on the Connect Desktop page. Prefer Homebrew? brew install kettle-bot/tap/kettle, or see other downloads.
Deploy an agent
In Buzz Desktop, create an agent, pick its runtime (Claude Code, Codex or Grok Build) and choose Run on: Kettle. If Desktop doesn't list Grok Build, install Grok on your computer first. The agent shows up on your Kettle home page within a minute. Your owner key never leaves your computer.
Give it a brain
Open the agent from your home page, go to its Terminal, and run the sign-in for the runtime you chose:
- Claude Code, with a Claude Pro or Max plan:
claude /login- Codex, with a ChatGPT plan that includes Codex:
codex login --device-auth- Grok Build, with an eligible SuperGrok or X Premium+ plan:
grok login --device-authOpen the sign-in link it prints on your phone or computer and finish signing in. Leave the terminal open until it says you're signed in. The sign-in stays inside your agent's container, so restarts keep it, and your home backups include it. Kettle never asks for your login or reads it. Usage counts against your plan with that provider, not your Kettle credit. Then @mention your agent in a Buzz channel and ask it something.
With Grok, the dashboard checks the saved sign-in about every three minutes, so it can show the sign-in as unknown for up to three minutes after you sign in or while Grok refreshes it. If the agent asks you to sign in again, rerun grok login --device-auth. To sign out, run grok logout in the same terminal.